This is default featured post 1 title

Go to Blogger edit html and find these sentences.Now replace these sentences with your own descriptions.This theme is Bloggerized by Lasantha Bandara - Premiumbloggertemplates.com.

This is default featured post 2 title

Go to Blogger edit html and find these sentences.Now replace these sentences with your own descriptions.This theme is Bloggerized by Lasantha Bandara - Premiumbloggertemplates.com.

This is default featured post 3 title

Go to Blogger edit html and find these sentences.Now replace these sentences with your own descriptions.This theme is Bloggerized by Lasantha Bandara - Premiumbloggertemplates.com.

This is default featured post 4 title

Go to Blogger edit html and find these sentences.Now replace these sentences with your own descriptions.This theme is Bloggerized by Lasantha Bandara - Premiumbloggertemplates.com.

This is default featured post 5 title

Go to Blogger edit html and find these sentences.Now replace these sentences with your own descriptions.This theme is Bloggerized by Lasantha Bandara - Premiumbloggertemplates.com.

VIDEO SONGS: Lucky 2005 All video songs 1280X544 HD

http://img691.imageshack.us/img691/1416/1vlcsnap2011081423h40m1.jpg
http://img855.imageshack.us/img855/1774/1vlcsnap2011081423h43m2.jpg
http://img856.imageshack.us/img856/8010/1vlcsnap2011081423h45m0.jpg
http://img31.imageshack.us/img31/3075/1vlcsnap2011081423h45m2.jpg
http://img6.imageshack.us/img6/5061/1vlcsnap2011081423h45m3.jpg
http://img709.imageshack.us/img709/9311/1vlcsnap2011081423h46m3.jpg
http://img51.imageshack.us/img51/8045/1vlcsnap2011081423h47m0.jpg
http://img819.imageshack.us/img819/3491/1vlcsnap2011081423h47m3.jpg
http://img710.imageshack.us/img710/1290/1vlcsnap2011081423h47m5.jpg
http://img811.imageshack.us/img811/3599/1vlcsnap2011081423h51m4.jpg
http://img804.imageshack.us/img804/430/1vlcsnap2011081423h52m1.jpg
http://img705.imageshack.us/img705/179/1vlcsnap2011081423h57m2.jpg
http://img814.imageshack.us/img814/4470/1vlcsnap2011081423h58m4.jpg
http://img808.imageshack.us/img808/3558/1vlcsnap2011081423h59m3.jpg

Lucky 2005 1280X544
Video Codec X264
Audio Codec AC3 5.1
Audio Bit rate 448Kbps

Aake bhar lo (.mkv 133 MB)


Chori Chor (.mkv 183 MB)


Lucky Lips (.mkv 177 MB)


Shayad Yahi (.mkv 149 MB)


Sun Zara (.mkv 160 MB)

VIDEO SONGS: Murder 2 2011 All video songs 1280X544 DVDrip

http://img11.imageshack.us/img11/7082/1vlcsnap2011080803h35m2.jpg
http://img607.imageshack.us/img607/25/1vlcsnap2011080803h35m0.jpg
http://img854.imageshack.us/img854/8794/1vlcsnap2011080803h03m3.jpg
http://img221.imageshack.us/img221/3330/1vlcsnap2011080803h02m1.jpg
http://img12.imageshack.us/img12/5265/1vlcsnap2011080803h35m1.jpg
http://img42.imageshack.us/img42/4781/1vlcsnap2011080803h37m1.jpg
http://img607.imageshack.us/img607/4781/1vlcsnap2011080803h37m1.jpg
http://img837.imageshack.us/img837/257/1vlcsnap2011080803h37m4.jpg
http://img97.imageshack.us/img97/558/1vlcsnap2011080803h37m5.jpg
http://img26.imageshack.us/img26/4079/1vlcsnap2011080803h38m3.jpg
http://img824.imageshack.us/img824/8916/1vlcsnap2011080803h39m5.jpg
http://img651.imageshack.us/img651/8474/1vlcsnap2011080803h40m3.jpg
http://img851.imageshack.us/img851/4018/1vlcsnap2011080803h42m2.jpg
http://img713.imageshack.us/img713/2553/1vlcsnap2011080803h41m2.jpg

Murder 2 2011 1280X544 DVDrip
Video Codec X264
Audio Codec AC3 5.1
Audio Bit rate 448Kbps

Aa Zara (I) (.mkv 127 MB)


Aa Zara (II) (.mkv 88.7 MB)


Aye Khuda (I) (.mkv 146 MB)


Aye Khuda (II) (.mkv 79.5 MB)


Hale Dil (.mkv 159 MB)


Tujhko Bhulana (.mkv 133 MB)

Pheonix Service Software 2011.24.002.46258 Cracked & Original Verson by Palash_c6

Pheonix Service Software 2011.24.002.46258

 Main component versions in the release:

• DK2 Driver Version 07.14.0.25
• Nokia Connectivity Cable USB Driver Version 7.1.42.0
• Flash Update Package 2011.24.000
• FLS-x Drivers Version 2.09.28
• FUSE Connection Manager v 2011.25
MAIN CHANGES & ERROR CORRECTIONS FROM PREVIOUS VERSION 2011_14_4_45945
New Products added
• RM-754, RM-755, RM-804, RM-696, RM-774, RM-761
Products removed
• RM-738, RM-739
New features
• New version of FUSE connection Manager
• New version of Flash Update Package
• New version of Autotuning components
• New version of Product API
• New version of Connectivity Cable Driver
• Installation checks the PC for Microsoft DOT.NET 2 Service Pack 2 and installs it automatically if PC has online connectin to Internet. If DOT.NET version 2 SP 2 or newer is found, installation continues normally. If PC is not connected to internet, and DOT.NET needs to be updated installation will be aborted. In this case DOT.NET must be updated manually before installation of Phoenix can continue
Error Corrections & changes
• Crash which occurred when Phone Information UI was open simulaneously with other menu´s has been corrected
• The Envira Tool ( The ZIP package generator in Help / Troubleshooting – menu) now has a button to delete existing old log files. This makes it possible to clear old logs before reproducing / logging problems to new log files which are then easier to analyse.
• “No Connection” – problem, which occurred when a connection without phone connected was selected has been corrected. Connection without phone can now be selected.
Please note:
• Microsoft DOT.NET version 2 Service Pack 2 is now the minimum requirement. Phoenix installation will check PC for the DOT.NET version and update it automatically when PC has online connection. Without online connection, old DOT.NET versions must be updated manually.
• New common data package location in use. Please see document SR1315 in KICS Information Center for further information.
• All Nokia Service Software Applications will use following location for product specific data:
- Windows XP: C:\Documents and Settings\All Users\Application Data\Nokia\Packages
- Windows 7: C:\Program Data\Nokia\Packages
• Please see atricles SR1774 and 1786 for more information on the use of Nokia Data Package manager – tool, and article SR1854 for more information on the Nokia Service Application Manager Tool.
• During installation, Data Packages should be installed in these directories, if they install to any other location by default. target folder for local data packages can be changed in the installation wizard manually
• This version contains the latest Tucson components. Therefore it is not necessary to use Tucson Add-On Installation Packages
• Before you start Phoenix or Care Suite installation to Windows 7 the User Account Control (UAC) should be turned off from Windows Control Panel settings.
• For more information concerning new options in “Firmware Update” – menu and their use, Please see documents SR1313 and SR1659 in KICS Information Center.
• Tucson operations combined with “flash” – option are now handled in the same way as “refurbishment”, which requires Mass Memory Content File to be available.
• Do not use Flash option simultaneously with product code change for USB Only phones, flash phone separately with Firmware Update
• It is recommended to use FPS-21 flash prommer with TCPIP connection when refurbishing USB Only – phones (RM-596 etc) due to mandatory optional MMC file size.
• Connection media to FLS-5 must be configured to be “USB_FBUS”, after FLS-4 support has been removed FBUS does not work anymore with FLS-5
KNOWN ERRORS & LIMITATIONS
• Software downgrade with Tucson system is only possible for BB 5.0 products supporting the Data Package 2 concept.
• Flashing with setup FLS-5, SS-46 and product specific adapter is not supported anymore. FLS-5 can be used with other product specific cables and adapters, but not with SS-46 Interface Adapter.
• If you install old DCT-4 data packages, Flash Update Package File installation path may be wrong. This is caused by very old DCT-4 data packages which contain Flash Update Package and overwrite current information during installation. If you experience problems when updating FPS-x prommers, please check that Phoenix “Prommer maintenance” is looking for the files from the correct location which is “C:\Program Files\Common Files\Nokia\Tss\Flash”. If not, Phoenix will show error “Update via ini – file failed”. In this case, select “Update” from that Phoenix “Prommer maintenance” – UI, browse to correct directory and select “fpsxupd.ini” for all other prommers except the FPS-8.
• Refurbishment flashing and product code change for RX-51 product requires SX-4 card to be available.
• FPS-21 flashing for RX-51 works only with TCPIP connection. FPS-21 prommer with new HW version 11 has been released to correct this. Sales pack code is 0089J83 , old HW version is not delivered anymore. Please see article SR1856 in KICS Information Center for the latest FPS-21 User Guide Document
• Please refer to product specific documents and instructions concerning the limitations of the RX-51 product
• RX-51 flashing does not work when CU-4 is used
• RX-51 Product Code changes work only without FLASH option, please flash phone separately
• When version 2010_12_8_42304 or newer with FUSE connection manager is installed on top of older Phoenix versions, there may be an additional delay of several minutes when you start Phoenix for the first time. Please wait patiently; Phoenix will start after configuration is finished.
• When using Data Package download functions with online connection, download times may occasionally be long. This is not caused by Phoenix (or Care Suite). The download speed from online servers is occasionally is known to be slow, depending on how data is buffered on caching servers.
• After you close Phoenix, it may not restart. To rectify this:
- Use Windows Task Manager to manually shut down phoenix.exe and FuseService.exe processes, or optionally restart your PC
• It is not possible to program Mass Media Content file to some devices over direct USB cable connection, due to the large size of the file. For these models a feature called “Media Check” has been implemented. When this type of product is connected to service software / PC via direct USB cable the refurbishment option will be disabled. Please use a flash prommer.
• To be able to use the help files in Windows 7 you need to install Windows Help program (WinHlp32.exe) for Windows 7. Ways to locate WinHlp32.exe:
- Start Phoenix with online connection to Internet, select “Help” and “Phoenix help”. Click the “Microsoft Help and Support” website link. Download WinHlp32 and install it.- Go to http://www.microsoft.com. Type “WinHlp32″ to “Search Microsoft.com” – field. Locate Windows Help program (WinHlp32.exe) for Windows 7 and install it
• When using flash prommers, only one connection type to one prommer is allowed. Please use either NFPD USB or NFPD TCPIP connection to one prommer, not both connections to same prommer
5. INSTALLATION
• If you have Phoenix External 2007.4.6.170 or older you must uninstall it before installing this release.
• Download Phoenix_Service_Software_2011_24_2_46258.exe application file to your computer (e.g. C:\TEMP).
• Close all other programs.
• Disconnect all flash prommers and phones which may be connected to PC via USB connection (reconnect them only after Phoenix installation has been completed)
• Run Phoenix_Service_Software_2011_24_2_46258 and follow instructions on the screen to install Phoenix Service Software
• If your PC does not have Microsoft DOT.NET version 2 Service Pack 2 or newer, and PC is not connected to internet you must update DOT.NET manually to the required version. When PC has online connection, DOT.NET will be updated automatically.
• Connect a dongle (PK-1, PKD-1, FLS-4S, FLS-5) when message appears on the screen
• If you are prompted to update any existing driver or file versions, select “yes”.
• Depending on the operating system, the PC may require rebooting.
• Allow Windows to register the Phoenix components.
• Open Phoenix, use FUSE Connection Manager to configure connections depending on the tools you use
• If you use CU-4, please pair the connection with service adapter by selecting “pair with service adapter” – option
• Update your prommer with the latest software included in this installation package.
• Install and use the latest available product specific data packages or flash bundles
Supported operating systems and user rights
• Windows XP Service Pack 1 or higher
• When installing Phoenix into Win XP you must have local admin rights.
• When using in Win XP, user must have power user rights.
• Windows 7 32 Bit version

Download Link:- 

Phoneix Cracked Download From Here

Phoneix Original Download From Here

INSTALL ANDROID ON HTC HD2 LEO TUTORIAL BY PALASH

MAGLDR::
Downloading flashing tools and ROM pack
Download necessary files to prepare for flashing MIUI ROM

STEP ONE
Download the latest MIUI ROM installation package Download ROM Now


STEP TWO
Download ROM-flashing tools Download Now (Size: 6.2MB)

Prepare a MicroSD/TF card with more than 100M free space.
Unzip HD2_Tools.zip onto the computer desktop and copy all files in the directory of “files needed to be copied to SD card” in tools to the root directory of your SD card.

STEP THREE
Don’t unzip MIUI_ROM installation package, copy it into the root directory of your SD card. The final SD card root directory includes the files shown in the picture below.

Folder Image


Note:
Please temporarily turn off such security tools as anti-virus software and so on.

Unlocking HD2
Check if your phone is unlocked, operate on the phone
Turn off the phone. At the same time, hold down VOLUME DOWN and POWER until the tri-color screen appears (see picture)
If the second line of the text (starting with SPL) on the screen is followed by the version number of HSPL, it means that your phone has been unlocked.


Operate on the computer
Connect the phone to the computer with the USB cable
Run HSPL2_RUN.exe , in the flashing tools, click "NEXT". If Windows User Account Control prompt appears many times, always click "Yes (Y)"
Select "2.08.HSPL"from the drop-down box, click "NEXT".


Wait a while until the phone screen appears "We Hacked it!". It means that you have unlocked successfully!
When the alert "Do you see we hacked it on the device?" pops up, click "Yes (Y)" to exit HSPL2.

Check if unlocked, operate on the phone
Turn off the phone. At the same time, hold down VOLUME DOWN and POWER until the tri-color screen appears (see the picture below). If you have entered the tri-color screen, you may ignore this step.
If the second line of the text (starting with SPL) on the screen is followed by the version number of HSPL, it means that your phone has been unlocked.


Installing MAGLDR guide
Preparation: Install MAGLDR guide to prepare for the injection of Android Recovery

STEP ONE
Operate on the computer
Make sure your phone is still attached to the computer with the USB cable and under three-color screen mode.
Run MAGLDR111\ROMUpdateUtility.exe。


Check "I understand .." in the first interface and then click Next. Check "I completed the.." in the next interface and then click Next.
When "Update" button appears, click "Update", and always click NEXT to start flashing guide.
Wait for the interface of "Congratulations!" and "Finish" button, click "Finish" to succeed!


STEP TWO
Success verification: operate on the phone
Check whether your phone has entered the following interface (MAGLDR guiding interface), if not, please first shut your phone down, then hold POWER to reboot (do not let go).


Unlocking HD2
Preparation: Unlock HD2 to change system kernel.

STEP ONE

Operate on the phone
In MAGLDR main interface, select the first item "4.USB Flasher" (use VOLUME to select, and DIAL to confirm)


Operate on the computer
Run Recovery\DAF.exe in the flashing tools, always click "NEXT". If Windows User Account Control prompt appears many times, click "Yes (Y)".
When "Waiting for USB connection…" appears on the screen, it means that Recovery is being injected.


The appearance of "Congralutions! …" means the it has completed! Click Next to exit.


Success verification: operate on the phone
At this moment, your phone is back to MAGLDR main interface, select the first item "1.Boot AD SD" (use VOLUME to select, and DIAL to confirm)
Later ClockMod Recovery (below) appears on the phone (as shown in the following picture), it means that this step is successful!

Injecting MIUI ROM
Inject MIUI ROM into your phone through Recovery.

Make sure the phone has entered the Recovery menu, if not, please refer to the last section in the previous step.

Operate on the phone
In the Recovery menu, enter "install zip from sdcard" (use VOLUME to select, and DIAL to confirm) , then go to"choose zip from sdcard"
Choose to enter MIUI ROM installation package copied into the root directory of SD card in the first step. Choose the option started with “Yes" in the next screen.
Now the ROM flashing begins!


When the alert "Install from sdcard complete." appears on the screen, it means the flashing has been completed.
Press POWER to return to the Recovery root menu, select "reboot system now", and press DIAL to confirm.


WELCOME TO THE MIUI FAMILY
If you see the following image after rebooting, it means you have flashed MIUI ROM successfully.


IF FACE ANY PROBLEM PLZ CONTACT ON: +8801711127161

MAIL: palash_c6@yahoo.com

INSTALL ANDROID ON SAMSUNG I8320 TUTORIAL BY palash_c6

Image


Two methods - A) and B) - to install - the method A) for a current use of the android (which always returns to android after reboot of the terminal and you will have to flash LiMO rom to get back to LiMo SO - without any loss of data) and method B) in which after a reboot the H1 returns automatically to LiMo, without loss of data, and you will hake to flash again to recover Android OS.

Formatting sdcard and partitions (use a sdcard reader):

Software needed:
EMSetup
https://www.sugarsync.com/pf/D410713_7558374_68565
(http://www.partition-tool.com/download.htm)

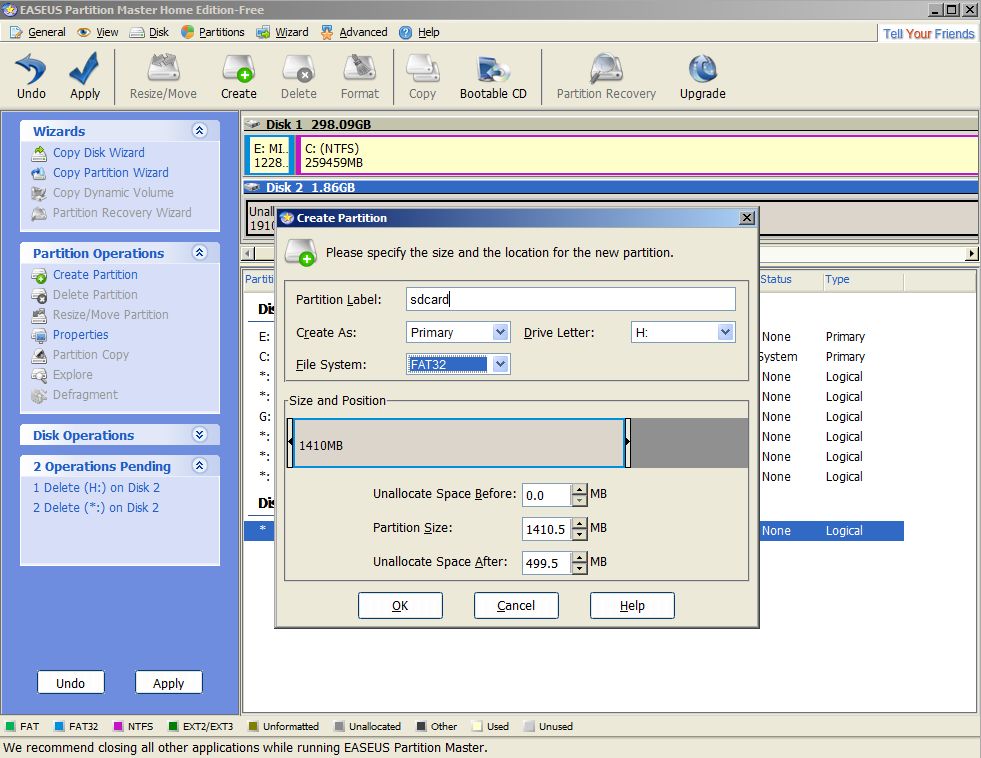
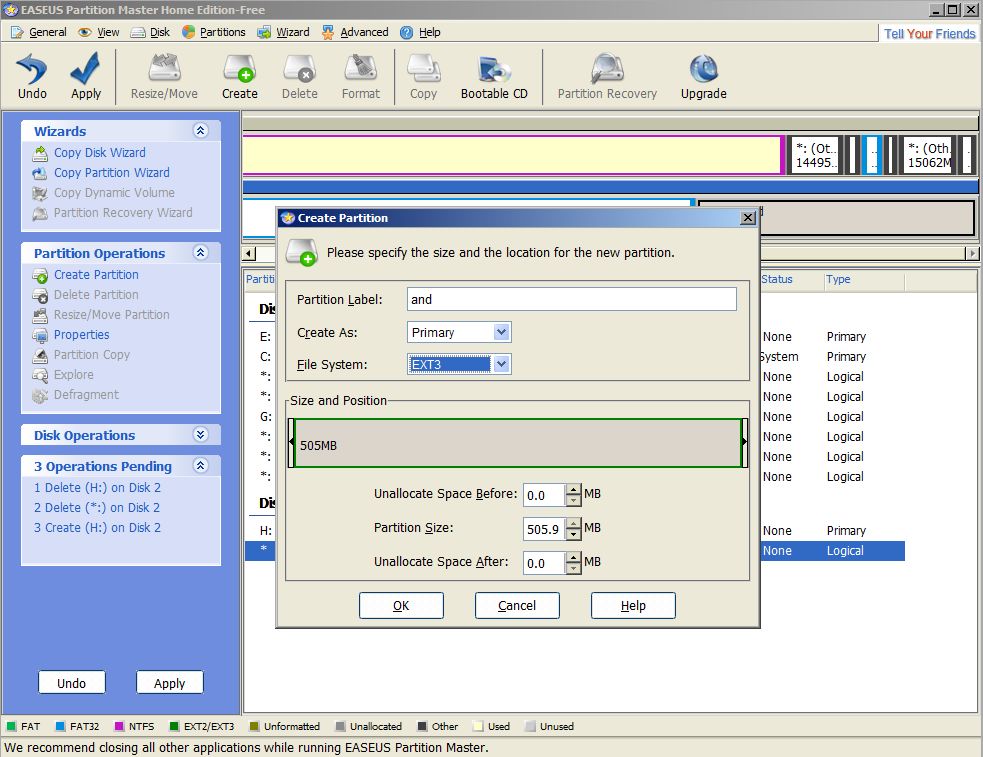
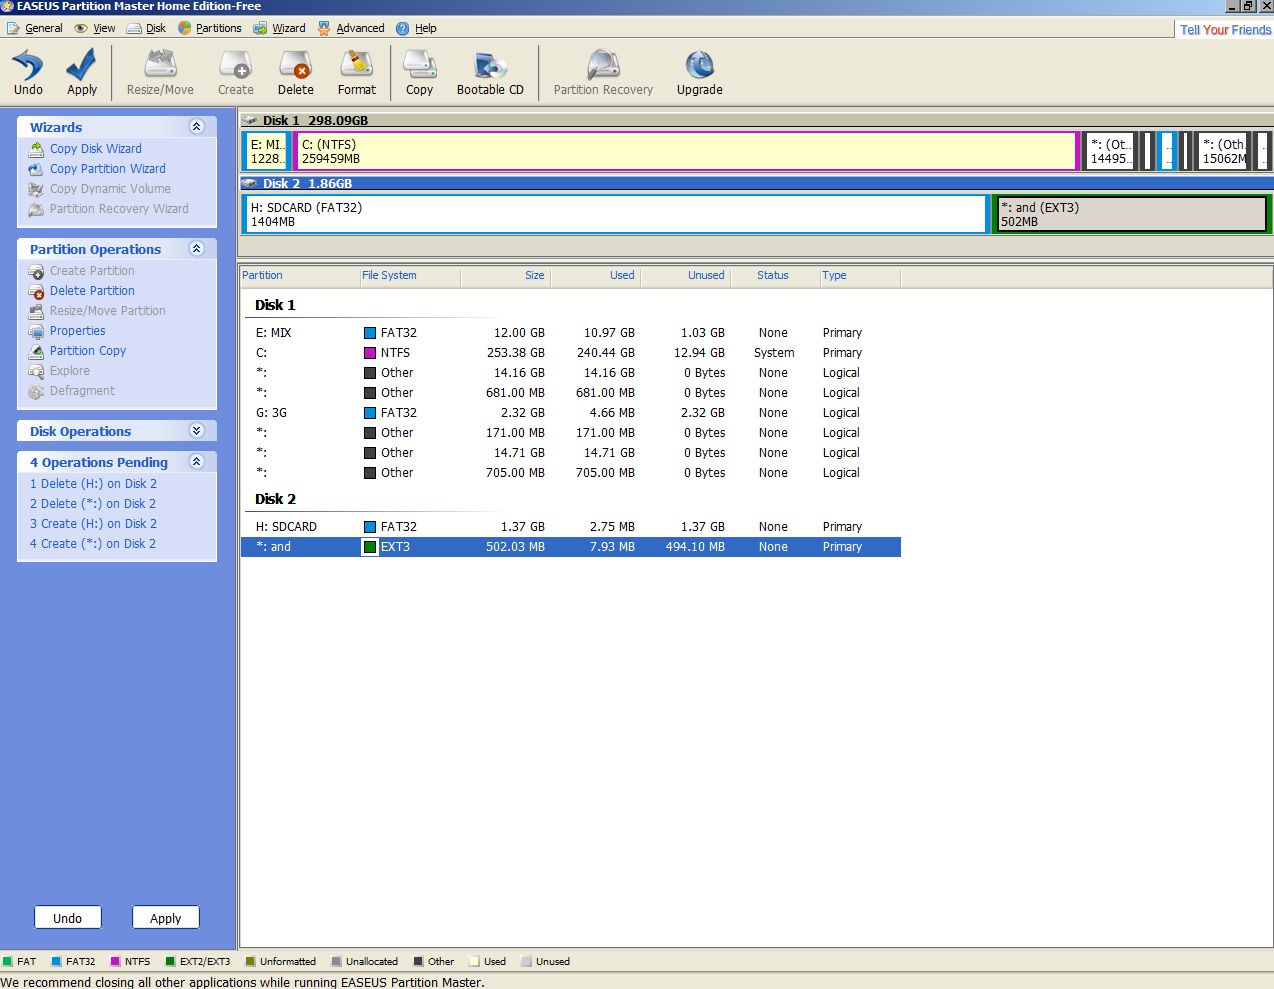
Format and create partitions on the sdcard - one in Fat32 (1st) and another with over 250 MB in ext3 (2nd)

The sdcard was formatted with the partition names: fat32 partition, 'sdcard' and ext3 partition with the name 'and' (= and Label)

Do not forget to click 'Apply' the changes.

Zoom in (real dimensions: 981 x 758)Image

Zoom in (real dimensions: 983 x 757)Image

Zoom in (real dimensions: 1274 x 989)Image


Download the rom - for extracting to sdcard, ext3 (\and)
rom file (gho):

0.3 [m] mod01 moi http://dl.dropbox.com/u/15746878/i832003m_moi1.GHO

Software ghost (to extract the rom to ext3)
https://www.sugarsync.com/pf/D410713_7558374_68567

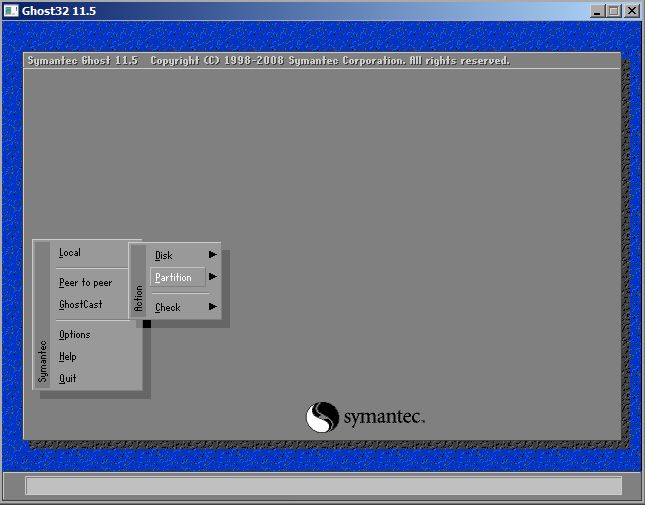
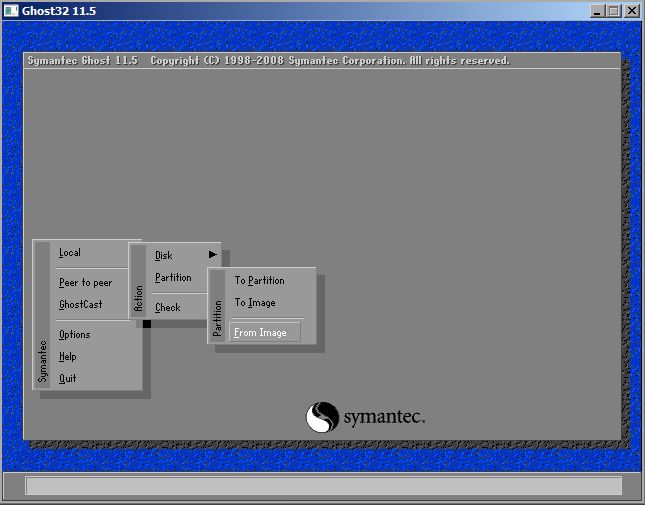
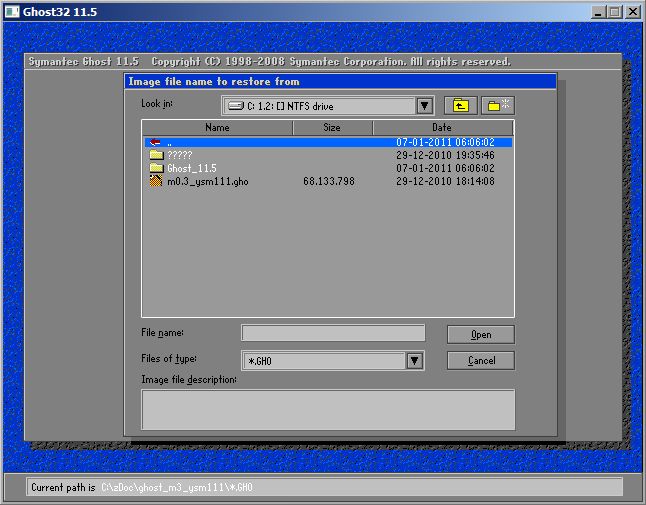
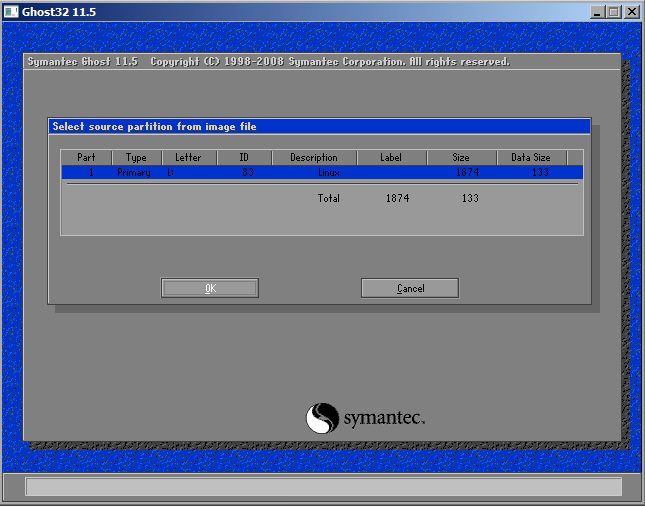
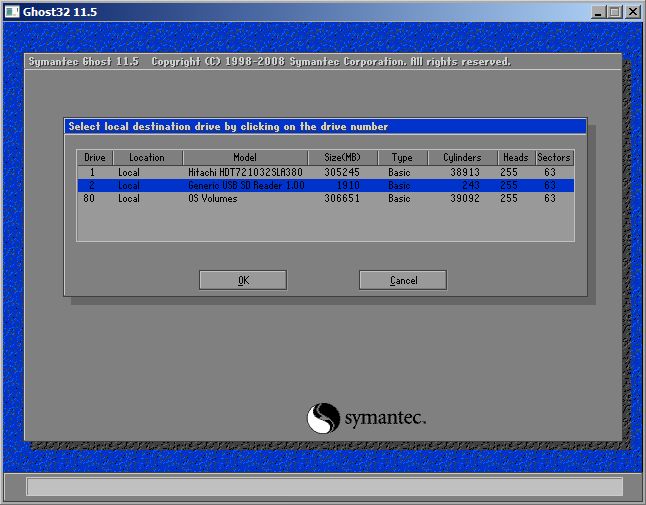
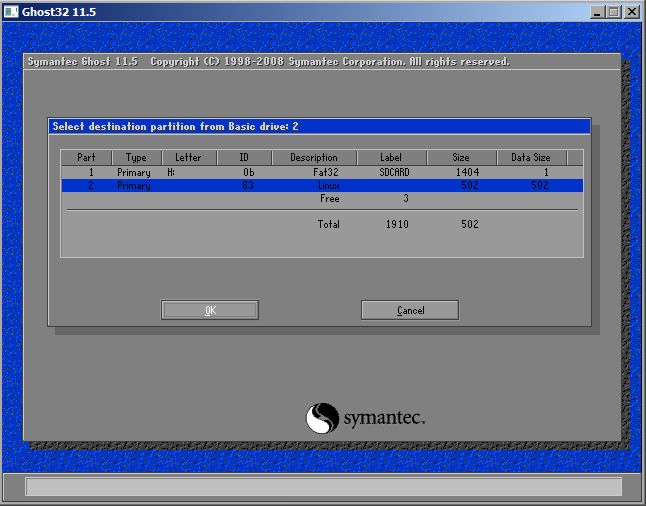
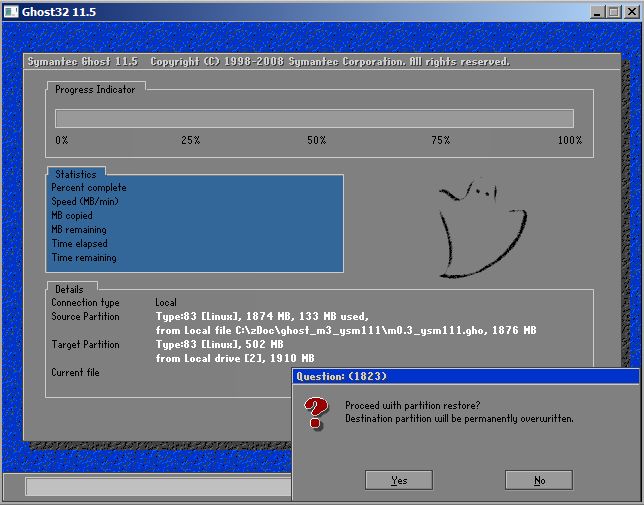
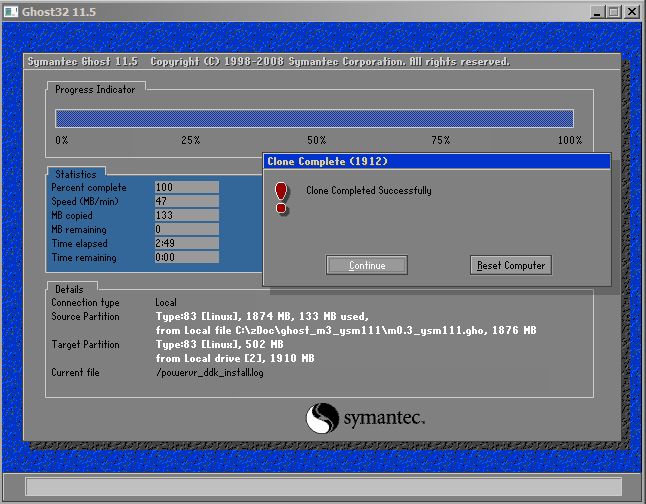
Run Ghost_11.5.exe and follow the steps:

Download image (i832003m_moi1.GHO) to a partition (ext3 'and') of the sdcard.

Zoom in (real dimensions: 645 x 506)Image

Zoom in (real dimensions: 645 x 505)Image

Zoom in (real dimensions: 646 x 505)Image

Zoom in (real dimensions: 645 x 507)Image

Zoom in (real dimensions: 646 x 505)Image

Zoom in (real dimensions: 646 x 506)Image

Zoom in (real dimensions: 644 x 505)Image

Zoom in (real dimensions: 646 x 504)Image


From here you have two alternatives: A) Windows (permanent) and B) Windows for a one session flashing with odin (back to LiMo after on/off or reboot).

A) Flash on Windows

(Open H1 in download mode (camera button + volume(-) button + power button and connect to the PC via USB)

I8320v03m.tar flashing mode PDA. (To return to the limo you will have to re-flash a LiMO rom, mode PDA - without any loss of data).

odin download windows https://www.sugarsync.com/pf/D410713_7558374_68569

Flash for Windows (tar file):
http://dl.dropbox.com/u/15746878/i8320M ... mod_01.tar

Method B) The flash is done from Windows and if we shut down the H1, when we turn back the terminal loads the Limo again - with any loss of data. That is, if by chance we shut down the h1 with android, we will have to flash again to go back to android.

B) Flash Odin on Windows

The odin windows works the same way as in Linux, after reboot back to the limo.
But the flash is done in windows.

Instructions:
Run WOdin_EN.exe choose boot.bin
http://dl.dropbox.com/u/15746878/WOdin_EN.exe

Download

Overclock 720 Mhz boot.bin http://dl.dropbox.com/u/15746878/boot1004c.bin (rename boot1004c.bin -> boot.bin
odin_windows32 http://dl.dropbox.com/u/15746878/odin_win32.exe


IF FACE ANY PROBLEM PLZ CONTACT ON: +8801711127161

MAIL: palash_c6@yahoo.com

Twitter Delicious Facebook Digg Stumbleupon Favorites More